Web Conferencing for Students
Zoom is an audio and video conferencing platform to conduct video and audio meetings, classes, and events. Key features of a Zoom student account include the following:
• Up to 300 participants.
• No limit on meeting lengths.
• Voice over computer audio.
• Local recording of meetings saved to your computer.
• Advanced tools: video sharing, document sharing, screen sharing.
To get started with Zoom, follow the instructions below to claim your Zoom account.

Note: On December 21, the Chicago Booth Student Zoom website was consolidated into the main UChicago Zoom website. After this date, your Chicago Booth Student Zoom account, and any Zoom meetings you have scheduled, were migrated to the UChicago Zoom website: uchicago.zoom.us.
To ensure a smooth transition, make sure your Zoom application is running the latest version (5.4.7) and log in to your account through the main UChicago Zoom website.
Troubleshooting Tip: if you previously logged in to the Zoom application via the Chicago Booth Student Zoom website, complete the following steps:
- Click your profile picture or icon in the Zoom application and select “Sign Out”
- When prompted to sign in again, select “Sign In with SSO”
- Enter “uchicago” as the company domain
- Enter your CNetID and password to complete log in
Claiming a Zoom Account
1.Visit the account login page for the URL needed to sign in to your account.
2. Click on the Sign in with SSO button in the main window. Note: if you are already signed in with SSO, you will not see this option.
3. Enter your CNetID and password. Zoom will auto-generate an account for you.
4. You will be redirected to your Zoom profile page to schedule and host meetings.
If you experience any problems while generating a new account:
- UChicago and Chicago Booth students: ensure that you are logging in through uchicago.zoom.us.
- Check to make sure that you are using the correct CNetID and password.
In addition to using Zoom within a browser, it is also possible to use Zoom by installing Zoom Client for Meetings.
Preparing for a Zoom Meeting
To host a successful meeting, we recommend the following equipment:
• A laptop or desktop computer
• A high-definition web camera. This allows you and your participants to meet virtually face-to-face. You may have a camera built-in to your computer.
• A headset with a microphone for voice over computer audio. Your computer may have a built-in microphone, however if you need higher quality audio for teaching or presenting, a headset will provide a better experience for your meeting participants.
Note: You do NOT need to use the VPN to access or start a Zoom meeting.
Join a Practice Session
After creating a Zoom account, individuals should start up a meeting to check their audio and webcam: log into Zoom, then click on “Meetings” in the sidebar, then on “Personal Meeting Room,” then the “Start Meeting” button. After clicking on the “Start Video” icon, look to see that the image is clear and that the green microphone button in the lower-left corner lights up when speaking into the microphone. When finished, students can click on “Leave Meeting” to exit the session.
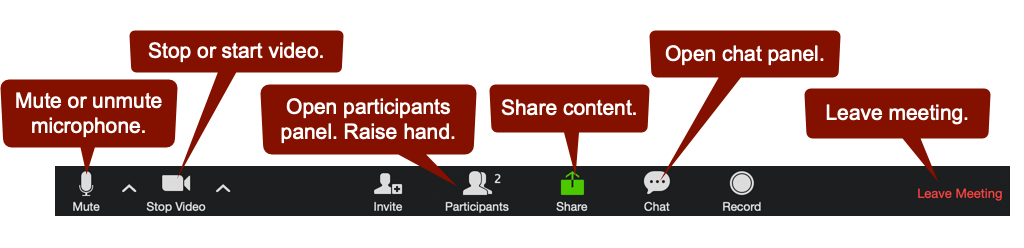
- Mute button
- Video button
- Participants button, including “Raise Hand” feature it enables
- Chat button
- Leave meeting button
If you use a keyboard only, screen reader, or other assistive technology when navigating the web, learn about Zoom’s accessibility features and keyboard shortcuts.
Scheduling a Zoom Meeting
1. UChicago and Chicago Booth students: enter the following URL into your web browser: uchicago.zoom.us.
2. Click on the Sign in with SSO button in the window. Note: if you are already signed in with SSO, you will not see this option.
3. Enter your CNetID and password.
4. Click the Meeting link in the left side of the Zoom window.
5. Click the Schedule a New Meeting button.
6. Enter the topic, date, time, and duration of the Zoom meeting. There are other default settings here that you may change: e.g., recurring meeting, mute participants on entry, enable waiting room.
7. Click the Save button to create your meeting.
8. Once the confirmation screen appears, you can click the Copy the invitation link on the right side of the window and paste the meeting information in your desired method of distribution.
Starting a Scheduled Zoom Meeting
1. UChicago or Chicago Booth students: enter the following URL into your web browser: uchicago.zoom.us.
2. Click on the Sign in with SSO button. Note: if you are already signed in with SSO, you will not see this option.
3. Enter your CNetID and password.
4. Click the Meeting link in the left side of the Zoom window.
5. Click the Start button next to your desired meeting.
6. Your Zoom meeting window will open, and you can join audio and start your video.
Best Practices for Hosting a Successful Zoom Meeting
• When scheduling a large meeting, click Mute participants on entry setting.
• Assign a cohost, student, or TA to monitor the chat box.
• If recording, use Presenter View (not Gallery View) to reduce file size.
• Ask participants to mute their microphone when they aren’t contributing.
• Ask participants to use the chat function to ask questions.
• Ask participants to turn on their cameras for better engagement.
• Let participants know if you are recording the meeting.
• If the door chime sound is disruptive, you can turn this off under your Settings tab.
• Contact Zoom support directly to receive assistance with issues while in a meeting.
For more information and resources, visit webconferencing.uchicago.edu.